
Millenium Panel Build 12.2016 for Adobe Photoshop (Windows / Mac)
Millenium Panel is a Photoshop Panel with retouching, brushing, painting, high dynamic range, contrast sharpness, color saturation features. Within the Photoshop craft, the separation of frequencies in images can be utilized for retouching. While there are a number of ways to implement the Frequency Separation technique. Typically, we break down the information data in our images into high and low frequencies.
Blending mode Linear Light presupposes the doubling of the contrast, to compensate it we reduce Fill to 50.

There’s a number of ways how to do that:
– This can be achieved using Curves, if you raise black point to position (0; 64) and lower white point to position (255; 192). The central point should be fixed at (128, 128).
– You can decrease contrast at Brightness/Contrast with Contrast setup at -50 and activated key Use Legacy.
– Curves or Brightness/Contrast can be used on the tonal map itself (Image-Edit-Curves). What you can also do is use adjustment layer by clipping it to the tonal map (use Clip to Layer).
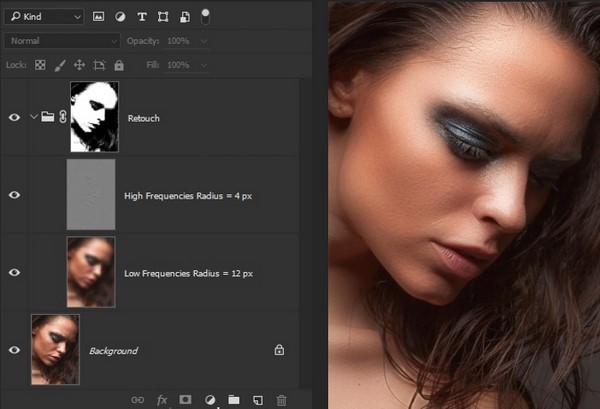
Separation into two frequency bands. Radius selection:
– Radius of High Pass is easier to pick up gradually decreasing it until you lost unnecessary volumes. In other words, we need to get texture surfaces on High Frequencies Layer with the High Pass filter and delete this texture from Low Frequencies layer with the Gaussian Blur filter.
– For High Pass it is better to set small radius, to fetch out small detalization.
– Gaussian Blur radius is better to adjust smoothly. Keep increasing it until the unnecessary details are no more visible.
– For Gaussian Blur it is better to set big radius to get rid of small detalization as much as possible and at the same time keep the information only about brightness and color distribution.
– If the shape is most important then it is better to adjust radius according to the content of LF (blurred picture)
– If surface texture is most important then it is better to adjust radius according to the content of HF.
For retouching on High Frequencies Layer, we can use the tools:
– Clone Stamp Tool (S)
– Healing Brush Tool (J)
– Clone Stamp Tool (S)
– Healing Brush Tool (J)
Auto Retouch 2GB
– decomposes image into 2 frequencies by Gaussian Blur filter. Use the selection tool to select the face, radius of separation is defined automatically.
– decomposes image into 2 frequencies by Gaussian Blur filter. Use the selection tool to select the face, radius of separation is defined automatically.
Auto Retouch 3GB
– decomposes image into 3 frequencies by Gaussian Blur filter. Use the selection tool to select the face, radius of separation is defined automatically.
– decomposes image into 3 frequencies by Gaussian Blur filter. Use the selection tool to select the face, radius of separation is defined automatically.
Retouch 2LGB
– decomposes image into 2 frequencies by Gaussian Blur filter.
– decomposes image into 2 frequencies by Gaussian Blur filter.
Retouch 2LSB
– decomposes image into 2 frequencies by Surface Blur filter.
– decomposes image into 2 frequencies by Surface Blur filter.
Retouch 3LGB
– decomposes image into 3 frequencies by Gaussian Blur filter.
– decomposes image into 3 frequencies by Gaussian Blur filter.
Retouch 3LSB
– decomposes image into 3 frequencies by Surface Blur filter.
– decomposes image into 3 frequencies by Surface Blur filter.
Fast Retouch
– makes skin smoother and glossier. This is a frequency separation with medium frequencies removal. By painting with the white brush over the black mask you can locally add the effect.
– makes skin smoother and glossier. This is a frequency separation with medium frequencies removal. By painting with the white brush over the black mask you can locally add the effect.
Hair Retouch
– makes hairs smoother and glossier. By painting with the white brush over the black mask you can locally add the effect. Also you can adjust High Pass filter of the smart layer “High Frequencies – Oil Paint Filter” by double click. It allows you adjust degree of effect as you want: the smaller the radius High Pass filter, the greater the degree of the effect.
– makes hairs smoother and glossier. By painting with the white brush over the black mask you can locally add the effect. Also you can adjust High Pass filter of the smart layer “High Frequencies – Oil Paint Filter” by double click. It allows you adjust degree of effect as you want: the smaller the radius High Pass filter, the greater the degree of the effect.
Requirements: Millenium Panel has been tested and working on Photoshop CC2015+
Download Links:


No comments:
Post a Comment